Pages

Sweet Sunday

Sunday, May 31, 2015

 
Happy Sweet Sunday!
I love to bake, but I never would because I didn't want to eat 12 cupcakes {and if they were in the house, I would} What I've finally decided to do is bake and give!  So pretty much every weekend I bake something, eat one, and give the rest away.  I give them to my parents, to my friends, to my mom's co-workers, I send them to work with Ryan and next I'm going to figure out how to ship some to my friends and family in other states!
 
 
 In honor of our 12 year wedding anniversary today, I wanted to bake something Ryan would like......
Carrot Cake Cupcakes with Cream Cheese Frosting! 
I made two batches, the remaining 21 will go with Ryan to work tomorrow.  I wanted to dress up the few that we will be keeping to enjoy.  I used the WPlus9 Cupcake Wrapper and Accessories dies to create a custom wrap.  I stamped them with this adorable carrot from the MFT Somebunny stamp set and colored them with Copic Markers.  I die cut the cute bow from Green Acres cardstock to match  my carrot tops.


I can't wait to eat mine tonight!.
I got the recipe from a book I checked out of the library called, Cupcakes by Shelly Kaldunski.  I'll see you tomorrow for the WPlus9 June 2015 Release!


Cardstock: WP9 White, Green Acres
Stamps: MFT Somebunny
Ink: Memento Black
Dies: WP9 Cupcake Wrapper and Accessories
Other: Copics

Weekend {WPlus9} Updates

Tuesday, May 26, 2015


Hi, how are you?
I hope you had a great weekend.  We had a nice, long, holiday weekend with beautiful weather. We got a lot done and had fun! Cleaning and baking and hiking and biking and crafting......
Unfortunately, I don't have a project to share yet.  I'm currently working on projects for the new WPlus9 Release: June 2015.  You are going to love these new sets and dies.  We will begin sharing projects on Monday, the 1st of the month.  For a few sneak peeks visit us on Instagram:
 
????
 
We will also have a new Design Team member announcement!
You're going to love her, chance are you already do.
In the mean time here are some ways to get involved through fun challenges from WPlus9.


I hope you'll play along for a chance to win great prizes.
See you later!


Copic Connect The Dots

Thursday, May 21, 2015

 
 Hey guys!
Still loving these colors. 
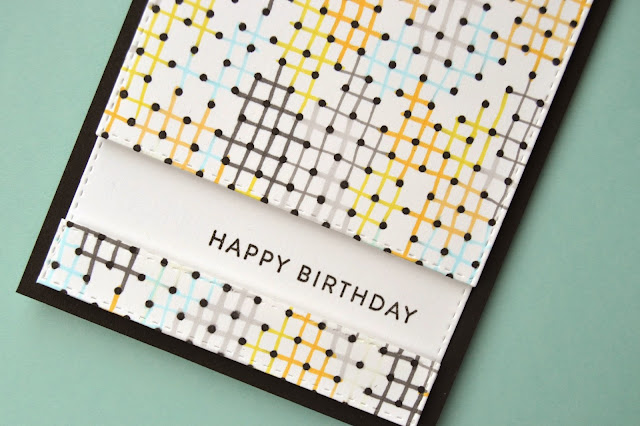
For this card, I started by stamping the small dot border from PTI Polka Dot Basics.  I drew the crosses, connecting the dots, in all of the same Copic colors I used on yesterday's card 
{T1, T4, T6, YR31, Y15, Y35, B00}.
 
 
I kept the design simple by just cutting out space for the sentiment and attaching it to a black card base.


Nice to see you again!
Have a great day.


Cardstock: PTI Black, Recollections White
Stamps: PTI Polka Dot Basics, Stylish Sentiments Birthday
Ink: Versafine Onyx
Dies: SSS Stitched Rectangles
Other: Copic Markers

Relax!

Wednesday, May 20, 2015

 
Happy Hump Day!  
I created this Copic background in a color combination that I love;  mostly grey and yellow with a little bit of blue.  I pretty much love grey with anything.


I'm looking forward to this Memorial Day weekend.  I have a half day on Friday and no school on Monday!  There are so many great festivals going on: craft, food, antiques, music.  Hopefully we'll get to one.  I'd love to do a little hiking with Piper, too.  The weather is supposed to be beautiful.


Thanks for stopping by.
Any good weekend plans?


Cardstock: WP9 Dove Grey, Coal Mine
Stamps: PTI Flipping Out
Ink: Versafine Onyx
Dies: PTI Flipping Out, WP9 Love Mom Layers Dies, SSS Stitched Rectangles
Other: Copic Markers, Wink Of Stella

Carried Away

Sunday, May 17, 2015

 
 Happy Sunday!
I needed a few staples from WPlus9 like black cardstock and my favorite red cardstock, Cupids Bow.  While I was adding these to my cart I decided to throw in a few stamp sets and dies that have been on my wish list {and then I'd get the added bonus of free shipping ;)}  One of those stamp sets was this great basic,
 
 
I stamped the star border twice with Versamark ink and heat embossed them with clear embossing powder.  I sponged on some Ocean Drive dye ink to create my starry sky.  I started heavy with the color at the top and faded the color out towards the bottom.  I die cut the circle from this sponged panel and inserted it into a white piece with the same die cut opening.  I also die cut the elephant from the sponged panel.  I positioned the die so that the elephant was cut from a portion of the paper that shows the subtle color transition from darker to lighter.
 
 
Hope you're having a great day!


Cardstock: WP9 White, Black, PTI Tropical Teal
Stamps: WP9 Unforgettable, Borders and Backgrounds 3
Ink: WP9 Ocean Drive, Versamark, Versafine Onyx
Dies: WP9 Unforgettable, Love Mom Layers Dies
Other: Clear Embossing Powder

Masked Stacks

Wednesday, May 13, 2015

 
I think I've used more markers on this project than any other!  I wanted to create a rainbow mountain of books using this image from Smart Kitty.  I'm definitely more of a dog person, but this set is just so cute.  I created two masks from a post it note and repositioned them as necessary to create these stacks. 
 
 
I kind of had the WPlus9 Sketch Challenge in mind when I started.


We are having some beautiful weather and it's still light at 8pm. 
It makes me so HAPPY, hope you are too!
See you later ;)


Cardstock: WP9 Black, Recollections White
Stamps: WP9 Smart Kitty
Ink: Memento Black, Versamark
Dies: WP9 Love Showers Tag Die, WP9 Smart Kitty, SSS Stitched Rectangle Die,
PTI DE Banner Die
Other: Copic Markers, White Embossing Powder

Masked Floral Highlight

Tuesday, May 12, 2015

 
Hey!
I had some time before dinner last night to work on an idea.  I wanted to use this WP9 Botanical Bunch stamp.  I wanted the whole image to be visible, but with the flowers highlighted and parts blending into the background.  I created a mask with the small circle die from WP9 Love Mom Layers.  I started by applying Nautical Navy ink with a sponge tool.  I also added a bit of Black Soot distress ink towards the edges to darken it a bit.
 
 
When I was happy with the saturation of color, I removed the mask and added Ocean Drive ink to the circle.  I blended the light into the dark to lighten up the area around the circle.  I stamped the floral image so that the large flowers were inside the highlighted circle.  I die cut the panel with the WP9 Sunshine Layers die centering the floral image rather than the circle.
 
 
Finally, I stamped the sentiment from WP9 A New Day. 
 

Hope you're having a great week so far.
Thanks so much for visiting!


Cardstock: WP9 White, Black
Stamps: WP9 A New Day, Botanical Bunch
Ink: WP9 Nautical Navy, Ocean Drive, Versafine Onyx, Black Soot
Dies: WP9 Sunshine Layers, Love Mom Layers

WPlus9 Sketch Challenge #1

Sunday, May 10, 2015

Happy Mother's Day!
 
 
WPlus9 now has a sketch challenge
 Have you heard? 
 
 
I thought I'd join Joni by making a card using her sketch and some fun WPlus9 supplies.  I stamped by background, using the new Love Mom Stamp Set, in Little Piggy, Sweet Gelato, and Mojito.  I did a lot of layering using dies from the Love Mom Layers die and the Love Showers Layers dies.


I hope you'll play along!
Have a wonderful Mother's Day
with your moms, grandmas, and children!


Cardstock: WP9 White, Sweet Gelato
Stamps:  WP9 Love Mom
Ink: WP9 Mojito, Sweet Gelato, Little Piggy, Versafine Onyx
Dies: WP9 Love Mom Layers, Love Showers Layers, PTI DE Ended Banner Die
Other: Enamel Dots

Hand Drawn Geometric Designs

Saturday, May 9, 2015


Good Morning!
The weekend is here and I couldn't be happier.  The weather has been so warm, sunny, and beautiful that I am actually looking forward to washing my car.  I've barely been in my craft room the last two weeks and I haven't really cared. 
 
Then inspiration strikes and I can't wait to get my ideas out.  Just like my last card, I drew my geometric shapes with a pen and then colored in select sections.  This time I only used Copics.  I chose pinks and oranges for a vibrant color combination, but softened it a bit with some vellum.  the vellum also hides some imperfections in my drawing ;)
 
 
I chose this beautiful, script sentiment from Waltzing Mouse to contrast the hard lines of the drawing.  I stamped it in Versafine Onyx ink and clear heat embossed it.  Both panels are cut with the large stitched rectangle die from Simon Says Stamp. 
 
 
 Thanks so much for stopping by.  Next, I'll share a card I made for the new WPlus9 Sketch Challenge.  You should play along for a chance to win a $20 GC to the WPlus9 store!


Cardstock: PTI Black, White
Stamps: WMS Big Day Today
Ink: Versafine Onyx
Dies: SSS Stitched Rectangles
Other: Copic Markers

BOOM! CLAP!

Thursday, May 7, 2015

 
 Started working on this piece last night and finished it today after work.  I really love it!  I started with a piece of Dove Grey cardstock.  I drew random triangles, of all different sizes, with a white gel pen.  When I was  finished, I filled in triangles with Copic markers, white gel pen, and Wink Of Stella {gold and silver}.  I stamped a sentiment from WP9 Unconditionally and then die cut it with the large circle from Love Mom Layers.  I popped up the panel on  a piece of black cardstock.  I added a few enamel dots and I was done.  Keep it simple.  I can't wait to try this again with different colors and maybe on a larger scale.
 
 
Thanks for visiting!


Cardstock: WP9 Coal Mine, Black, Dove Grey
Stamps: WP9 Unconditional
Ink: Versafine Onyx
Dies: WP9 Love Mom Layers Dies
Other: Copics, White Gel Pen, Silver and Gold Wink Of Stella, Enamel Dots

Quick Tip: Embellished Envelopes

Saturday, May 2, 2015


Add special touches to envelopes by lining the flap with a border die cut.  It's a quick and easy way to add detail to the outside of the envelope.  I will be sending a card in this pink heart envelope to my mom for Mother's Day.
 
 
I pulled a few more border dies from my collection that would
work well.
 
 
Have a great day!

Wonderful Friend Gift Tags

Friday, May 1, 2015

 
 I recently took a girls' trip to Savannah with three of my friends from high school.  Although we no longer live near each other, we have remained great friends.  Even after months and sometimes years without talking, we always seem to be able to pick up right where we left off.  We talked easily and laughed until our stomachs hurt.  It took quite a while until we could manage to coordinate all of schedules and get away at a time that worked for everyone.  It just so happened to be Easter weekend.  I wanted to bring them an Easter basket full of some of my favorite things and some sweet treats for them and their pets!
 
 
Of course I had to dress up the tags for their gift bags.  I started by die cutting the tags with the new Love Showers Layers stitched tag die.  I then stamped flowers from Embroidered Bouquet in Fairy Dust accented with flowers and leaves stamped in Wild Mango, Little Piggy, and Mojito.  Once that was done I stamped my sentiments in black inkTo add a little interest and texture, I used the circle die from the Love Mom Layers die set to emboss rather than cut.  This highlights the sentiment while still keeping the design simple.


I thought you might like to see what I included in their Easter bags.  Along with those pictures above I included a Cadbury Crème Egg and some homemade dog treats.  I shared the recipe for these on Instagram

 
Bottom Left: Essie Ballet Slippers
 
 
Everything was packaged in a kraft bag and the tags were tied on with some cotton rope.  They loved the tags and the goodies inside!
 
Join me on the WPlus9 Design Blog today to see a project using this PURE Color Combination and a fun double partial die cutting with inlay technique!


Proudly designed by | mlekoshi playground |