Pages

Showing posts with label cuttlebug. Show all posts

Back To School

Tuesday, September 3, 2013


Today I go Back To School.
  I thought it would be nice to make notepads for a few of my co-workers.
I'll slip them into their mailboxes this morning when I get in. 
  
 
It might get a little quiet around here as I adjust to my new schedule,
but I'll get back into a groove soon!
Thanks for stopping by today.


Cardstock: PTI Pure Poppy, Kraft, WP9 White, PTI Pure Poppy Patterned Paper Pack
Stamps: PTI Take Note, Teacher's Apple
Ink: PTI Pure Poppy, Ripe Avocado, Dark Chocolate, Versafine Onyx
Dies: PTI Teacher's Apple
Other: PTI Black Satin Ribbon, PTI Buttons

Pretty In Pink{s}

Thursday, August 15, 2013


I finally got this floral set.
I wanted it from the first peeks I saw on Instagram.
I waited, it was out of stock, I waited, it was out of stock again.
I am so glad I decided to get it! 
 I really think it is impossible to make a bad card with this set!


I can't wait to play with my new nautical set next!
See you later:)


Cardstock: PTI White, Sweet Blush, Raspberry Fizz Bitty Dot Paper, WP9 Gelato
Stamps: WP9 Quite Like You, Fresh Cut Florals
Ink: PTI Raspberry Fizz, Hibiscus Burst, Sweet Blush, Ripe Avocado, Simply Chartreuse
Dies: WP9 Fresh Cut Florals, PTI Sending You, Lil' Inker Bow Die, PTI Linen Impression Plate
Other: Rhinestones, Score Board

Trendy Triangles

Sunday, July 28, 2013


Good Morning!
How are you?


 I made this stamped piece quite awhile ago and couldn't bear to cut it up.
I finally had enough time to accept the fact that I didn't want to use the
whole piece on a card.  
It had to be cut!
I figured the Moxie Fab Trendy Triangle challenge 
was a good a reason as any to finally do it.


It didn't even hurt...that much;)
Thanks for stopping by!


Cardstock: PTI White, Black, Vellum
Stamps: ME Trifecta, PTI Movers and Shakers
Ink: PTI, Versafine Onyx
Dies: Lil Inker Small Bow, Pinking Shear Border
Other: MME Enamel Dots

ColourQ Challenge #193

Tuesday, June 11, 2013


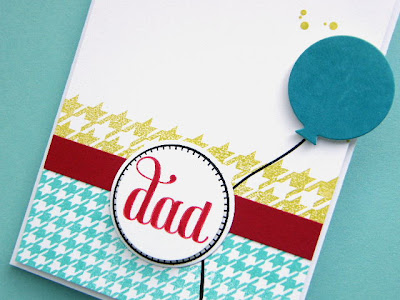
What a great turn out last week! You're projects were so beautiful and creative!
More fun, bright, colors this week from Arielle!
Perfect for those summer birthdays or a Father's Day card.


I hope you'll join us this week at the ColourQ!!


Cardstock: PTI White, WP9 Cupid's Bow
Stamps: PTI BB Houndstooth, Birthday Style, WP9 Folk Art Flurries, WMS
Ink: PTI Limeade Ice, Hawaiian Shores, Pure Poppy, Tim Holtz Distress Ink Broken China, Versafine Onyx
Dies: PTI Circles, Birthday Style Balloon

I Gave My Husband A Hammer

Monday, June 10, 2013

 
Have you ever read the children's book If You Give A Mouse A Cookie?
If you haven't, it's a story (a series of stories really) that starts with one action setting off a chain of events.  That's kind of what happened to me when I gave my husband a hammer!
 
 
I had purchased a rod and bucket system that is mounted on the wall for storage in my craft room from Ikea.  Ryan got around to putting it up for me on Saturday.  I was there to assist:)  He says, "Where's that hammer you keep in here?"  I handed it to him and started thinking about how I hadn't used it in a long time.  I used to use it all of the time to set eyelets and things.  That set off the chain of events that had me pulling out more old products that I hadn't used in a long time like my Metallic Rub Ons. Both the letters and pocket are clear heat embossed and then rubbed with the metallic rub ons.  It creates a really neat effect. 
 
 
Here you can see the little buckets above my desk.  They hold things like markers, watercolor pencils, paint brushes, and my gelatos.


This one is perfect for my father-in-law!


Cardstock: PTI White, Kraft
Stamps: PTI Men of Life, WP9 Sweet Nothings, Pocketful
Ink: PTI Chocolate, Kraft, Versamark Ink
Dies: WP9 Pocketful, PTI Block Alphabet
Other: Twine, Metallic Rub Ons, Metal Eyelets and Snaps, Clear Embossing Powder

Happy!

Saturday, June 8, 2013


I recently picked up some beautiful new MME papers and thought this MIM is the perfect opportunity to use them.

 
A few posts ago I had tried an idea I had using modeling paste.  The results were good, but exactly what I wanted. 
Stephanie had a great suggestion:
 
Another great post Kara. I like the layered look you've achieved here and all the creative experimenting you've been doing lately too. I am curious, if you've tried using the paste on a nonstick sheet, and if you can transfer an element to paper after it dries?
 
Genius, right?
So, of course, I tried it right away.
It totally worked.  I spread a thin layer and a thick layer of modeling paste over stencils directly onto my craft sheet.  Both worked!
Tip #1: Let it dry COMPLETELY.  I get a little impatient sometimes:)
In the photo below you can see I tried coloring them in various ways before and after spreading it onto my craft sheet.  The pieces colored with gelatos were colored before spreading over the stencil.
( I used my least favorite gelato color to test..lol! Just slice a piece off of the stick and mix it into your modeling paste with a palette knife)
  Because it had water based color added to it, it dried more flexible than the other pieces.  The ones that are solid modeling paste are a bit more stiff and brittle.
Tip #2: Be careful.  Both keep their shape well, but are still very fragile.
They took every coloring medium I tried very well. 
 My favorite were the pieces sprayed with the HS Color Shine sprays.
 
 
Thanks for stopping by!
I hope you are having a wonderful weekend!


Cardstock: PTI White, Harvest Gold
Paper: My Mind's Eye
Stamps: PTI SS Birthday
Ink: PTI Aqua Mist, New Leaf
Dies: PTI Turning a New Leaf, Beautiful Blooms II
Other: Copics, Gelatos, Color Shine Sprays, Acrylic Paint, MME Dots

Die Cut Stencils and Layered Modeling Paste

Sunday, June 2, 2013

 
Here's another experiment with modeling paste.
I wanted to know how the paste would look if I layered it and if
 I've learned anything from Donna Downey it's that when you say,
 "What if...?" then you should go for it!
I created my own stencils using my dies.
First I mixed up the green and applied that using my leaf stencil.
I had to let it dry completely before adding my next color so it was the perfect project to work on while I cleaned the house.
When it was dry I mixed up and added the light yellow flowers, then the orange flowers, then finally the red berries/flower centers.

 
I love the overall look, but had hoped the layers would have been a little bit more opaque.
That could probably be remedied by using  a different medium for tinting the paste.
The paper got all wavy as the paste dried, so I went with it and distressed the edges with an xacto knife to add to the not-so-perfect look.  I had also hoped to get those red dots more separated, but because I was placing the stencil on an uneven surface {the flower} all three dots sort of smooshed together.  After I accepted the imperfection :) I kinda liked it anyway

 
All in all I like the look and it was a lot of fun to do!
 
 
See you later.
Have a great Sunday!


Cardstock: PTI White, Harvest Gold
Stamps: PTI Pretty Peonies
Ink: PTI Orange Zest, Summer Sunrise, Pure Poppy, Harvest Gold, Spring Moss, Simply Chartreuse, Versafine Onyx
Dies: PTI Beautiful Blooms II, Turning a New Leaf
Other: Hole Punch, Modeling Paste, Pearls, Black Copic Marker

Coloring Modeling Paste With Ink

Saturday, June 1, 2013


Modeling Paste is so much fun to use. You could also try embossing paste or fiber paste.  All of these products give you a dimensional effect.   On a previous card I used the modeling paste straight out of the jar and colored it with gelatos after the paste had dried.  For my project today, I wanted to ensure that my colors matched the other elements of the card, like the cardstock and the stamped sentiment.
To do that, I mixed my modeling paste with ink before I applied it to my card.


Onto my craft sheet, I rubbed some ink directly from the ink pad.
Scooped out a little modeling paste and then  mixed them together with  palette knife.
Once the color was thoroughly mixed I applied some over my stencil onto my cardstock. 
I did the same thing with the other two colors overlapping slightly to get a gradient effect.
You could apply it before the color and paste were completely combined to get a marbleized look.
Try combining more than one ink color at a time...ooohh....I'm going to try that!


Thanks so much for coming by today!


Cardstock: PTI Soft Stone, Ocean Tides, WHite
Stamps: PTI SS Birthday
Ink: PTI Aqua Mist, Ocean Tides, Limeade Ice
Dies: PTI Banner Builder
Other: Liquitex Modeling Paste, Polka Dot Embossing Folder, Prima Stencil

Quite An Honor

Monday, May 27, 2013

 
hi! 

 
I loved the layout of Aimee's card.
For my banners I used Tim Holtz tissue.  I glued the tissue to white cardstock with matte medium. 
When it was dry, I spritzed it with several colors of Heidi Swapp Color Shine.
Once that dried, I cut the piece into banners, strips, and hearts.


Thanks so much for stopping by.
I'm so excited to be Moxie Fabber Of The Week!
There's an interview over at the Moxie Fab World Blog if you're interested.
It's quite an honor. Thanks, Cath!


Cardstock: PTI White, Cream, Ocean Tides
Stamps: PTI Delightful Dahlias
Ink: PTI Kraft, Ocean Tides, Tea Dye Duo
Dies: PTI Banner Builder, Love Lives Here
Other: Tim Holtz Tissue Paper, Heidi Swapp Color Shine Sprays, Little Yellow Bicycle Wood Pin, Twine, Matte Gel Medium
Proudly designed by | mlekoshi playground |