Pages

Adding Glitter With Die Cut Adhesive Sheets

Friday, July 31, 2015

 
I was so inspired by the sketch, I decided to create another project for this week's CAS(E) this sketch! Challenge.
 
 
 I die cut the large corner piece from a sheet of double sided adhesive.  {This is my favorite} I then die cut that piece into different sized curves.  Removing the backing from only one side, I pieced the circle back together into the corner of a card front.  Once all of the pieces were in place and the partial circle was reconstructed, I die cut the card front using a stitched rectangle die.
 
 
Now, I could remove the front release paper to reveal the adhesive in sections and add my glitter.  I burnished the glitter into the adhesive with my finger to make sure there was good coverage.  It also ensures that glitter doesn't come off later.  Once this was done I searched for just the right sentiment.  I chose this one from Sparkle and Shine.  I added a layer of black cardstock and a black die cut butterfly.  All of the visible black cardstock got a coat of clear Wink Of Stella!
 
 
Thanks so much for coming by.  Have a great weekend!
New projects have been added to the Friday Inspiration File.  Enjoy...#229!


Cardstock: WP9 White, Black
Stamps: WP9 Sparkle and Shine
Ink: WP9 Black
Dies: WP9 Small Butterfly Frame Die, LF Circles
Other: Double Sided Adhesive Sheets, MS Glitter, Wink Of Stella Clear

It's Been Too Long

Thursday, July 30, 2015

 
Hi!
Today's card was a lot of fun to make.  I started by die cutting a circle from the corner of a piece of copy paper.  I used both the positive and the negative pieces to create my mask.  I placed them on my card front and sponged on the orange dye ink.  I used the same masks and moved them towards the corner of the card front making sure to cover the orange ink completely, but right to the edge because I didn't want any white space between my colors. I think that would look cool, too, though!  I alternated the thick and thin ends of the sponged areas.
 
 
I repeated the process again to sponge on the navy ink.  Because I was gong from navy to pink, I created a new set of masks.  I didn't want to contaminate the pink with the dark blue.

 
Once all of my ink was sponged on, I stamped my sentiment.  I curved the sentiment on my block to match the line of the orange ink.  I attached a die cut butterfly to draw your eye to the sentiment.  I chose this butterfly, in particular, because it is not solid and allows the color to come through.

 
Thanks so much for stopping by!


Cardstock: WP9 White, Black
Stamps: WP9 Hand Lettered Hello
Ink: PTI Summer Sunrise, Melon Berry, Enchanted Evening, Berry Sorbet, Versafine Onyx
Dies: WP9 Small Butterfly Frame Die, LF Circles, SSS Stitched Rectangles
Other: Sponge Daubers

Today Is Going To Be Awesome {Adult Coloring Resources and Links}

Wednesday, July 29, 2015

 
Adult coloring book/ cards/ pages have become quite popular.  It seems everyone is rediscovering their love of coloring.  It's definitely relaxing.  Something that we, stampers, have known all along.  We've never stopped coloring, but it's nice that now we have so many options besides just coloring our stamped images.
 
 
There are many resources for free printables.  This one, that I have colored, is one of my favorites.  The artwork is by Valentina Harper.  You can print it ------> HERE.  I like this option because you can print them on whatever paper you prefer. 
 
There are also sellers who have wonderful designs for purchase.  I did a quick search on Etsy and found over 4,000 items ------> HERE.  Again you have the luxury of printing on the best paper to suit your coloring medium.
 
There are amazing books available in book stores as well as online.  Some of my favorites are: Animal Kingdom by Millie Marotta and Geometric Patterns by Lisa Congdon.
 
Finally, while you're placing an order for the latest stamps and dies you could toss in some cool coloring cards or books!
 
OK, I'm headed out to buy a frame to hang this one in my craft room!


Stamping And Coloring Die Cuts

Saturday, July 25, 2015

 
Hey! I seem to have gotten into a posting pattern this summer.  Posting on the weekdays and taking the weekend to just hang out.  Which is the opposite of what tends to happen during the school year.  However, I wanted to join in with the PTI July Blog Hop today so here I am.  Technically, though, this post is getting done on a weekday.  It's actually Friday evening.  I wanted to get this post together early because we will be canoeing when this post goes up!  I can't wait.
 
 
So, the inspiration photo {pictured below} for the blog hop has a very Victorian and vintagy feel.  I like it, but wanted to try to make
my design a little more clean and modern.
 
 
I die cut the three butterflies from white cardstock and stamped the peonies with Memento black ink.  I colored the flowers, leaves, and background with Copic Markers.  I attached them in a vertical line with foam tape after adding a little curl to their wings.  I use the same motion you use with a pair of scissors on curling ribbon, but just with my hands on the cardstock.
 
 
Thanks so much for stopping by.
Enjoy the hop!


Cardstock: PTI Black, Recollections White
Stamps: PTI Pretty Peonies
Ink: Memento Black Ink
Dies: PTI Beautiful Butterflies, SSS Stitched Rectangle Dies
Other: Copic Markers

Friday Inspiration File Week #228

Friday, July 24, 2015

TGIF! It's Friday and you know what that means...more time to craft. At least I hope that's what it means for you.  You guys never disappoint; I never have trouble finding beautiful inspiration to add to The File.  Below are just a few of the projects you will find in there this week {labeled #228}
 
Top Left: Jenny                      Top Right: Amy
Center Left: Veronica              Center Right: Marika
    Bottom Left: Ka                     Bottom Right: Yana
 
 
Have a great weekend!
Who or what has inspired you this week?


Quick Tip: Send More Cards

Thursday, July 23, 2015

 
Many people often express that they need to send more cards.  I shared a picture on Instagram showing my process for making sure to mail cards to friends and family.  It's quite simple, but ensures that I never forget anyone.  I received this greeting card organizer a long time ago. There are plenty others on the market {here and here for example} or you can make one yourself.  Each page represents a month and each month has a pocket where you can keep the cards you want to send out to the people on that month's list.  I never use the pockets because my cards are way too thick!
 
 
 Near the end of the current month, I look ahead to the next month to see who's birthday or anniversary is coming up.  I choose a card for each occasion, write them out, address them, and place a stamp on the envelopes.  I attach a post-it note to each envelope with the date of the occasion. {If I'm feeling really organized I'll put the date that I need to place the card in the mail instead of the date of the actual birthday or special occasion} I keep them in number order in my craft room. Then, usually about a week before the date, I drop the card(s) in the mail. I know I'll see them because I go in there every day;)
 
 
I usually do this when I want to be in my craft room,
but don't feel inspired to make something.  It doesn't take long {unless you have to chase your husband around with a pen for him to sign them ;)} and now I'm all set for August!
I hope this helps you send out more of your beautiful cards!
 

My Everything

Wednesday, July 22, 2015

 
I think it's time to invest in some reinkers.  I love all of my Papertrey Ink dye inks, but they are starting to dry out a bit.  I have every color, so buying all of the reinkers is not going to be cheap.
 
 
Today's card started out with two parameters in mind: Line and Color.  I started by masking off a horizontal line with a strip of masking paper.  I chose several triangular shaped stamps from a Paper Smooches stamp set called Design Motifs.

 
Starting with red on the left, I stamped 3 triangles up and 3 triangles down overlapping and varying the heights.  Moving to the right I repeated the process changing the color after 3 triangles.  When I was finished I removed the mask and stamped a sentiment from a Simon Says Stamp set called All Occasion Banners.
 
 
I die cut the front panel with a stitched rectangle die
and popped it up on a white card base.
Thanks so much for stopping by!


Cardstock: PTI White
Stamps: PS Design Motifs, SSS All Occasion Banners
Ink: PTI Pure Poppy, Berry Sorbet, Harvest Gold, Hawaiian Shores, Versafine Onyx
Dies: SSS Stitched Rectangle Die
Other: Masking Paper

Watercolor Over Die Cuts

Tuesday, July 21, 2015


Today I'm joining Papertrey Ink for their weekly
Make It Monday Challenge: Watercolor with Die Cut Stencils.
 

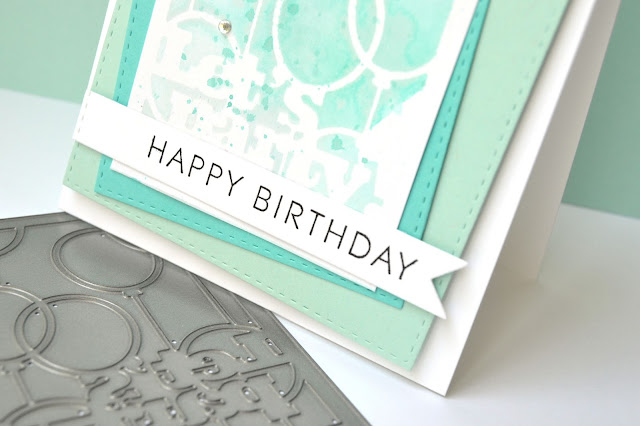
I used a die, called Text Black Party,  to create my stencil.  I die cut it from a sheet of masking paper.  I placed the stencil, or mask, onto white cardstock and burnished it with my bone folder.  I used dye ink as my watercolor.  I swiped several ink pads onto my craft mat and spritzed them with water.  I then dipped the cardstock into the colors, letting them drip and pool.  I allowed it to dry before adding more colors.  At the end, I added splatters of color using a paintbrush loaded with ink tapped against my bone folder.
 
 
My second card started out the same way, but rather than smoosh the cardstock into the dye ink watercolor, I brushed each color on in horizontal stripes.
 
 
I added the same splatters as before and then allowed them both to dry completely before removing the mask.   Once the masks were removed I was able to do some stamping and embellishing.
 
 
I used Aqua Mist, Hawaiian Shores, Tropical Teal and Ocean Tides ink to create my watercolors.

 
Thanks so much for stopping by today!


Cardstock: PTI White, Aqua Mist, Hawaiian Shores
Stamps: SS Birthday
Ink: PTI AM, HS, TT, OT, Versafine Onyx
Dies: PTI DE Banner Die, Text Block Party, SSS Stitched Rectangles
Other: Masking Paper, Rhinestones

Get Your Sunglasses

Monday, July 20, 2015


Today I have two {very} bright cards to share.  I don't normally use colors like this, but today I was drawn to them.  I wanted to work with a little ink blending and masking.  I used distress inks in the colors Mowed Lawn and Mustard Seed. On this first card, I die cut a square of white cardstock.  Using removable adhesive, I temporarily adhered the square to my craft mat.  I came in from one end with the yellow and in with green from the other end.  You could blend the colors on a larger piece of cardstock and die cut after to make it a bit easier to work with, but I like that the edges end up a bit darker as you move from the craft mat onto the cardstock.
 
 
I positioned a square of copy paper onto the center of my card front and temporarily adhered it {it was left over from the mask I created for my second card}.  I stamped my sentiment and the butterfly in the same position as they were on the ink blended square so that when I placed the square on the card front the sentiment and butterfly image would line up.


For my second card I created a mask that left only the square portion of the card front open.  I added distress ink the same way as before.  I removed the mask and stamped my sentiment and butterfly in Versafine Onyx ink.  I have a wonderful marker, that I have shared before, that is perfect for filling in any imperfections in stamping.  It's a black Pitt Pen by Faber Castell. 
 
 
Thanks so much for stopping by!


Cardstock: PTI White, WP9 Black
Stamps: PTI Beautiful Butterflies
Ink: Distress Ink, Versafine Onyx Ink
Dies: PTI Beautiful Butterflies, PS Stitched Frame Dies ,SSS Stitched Rectangles
Other: Faber Castell Pitt Pen
Proudly designed by | mlekoshi playground |