Pages

A Series of Birds

Thursday, July 29, 2010


I really liked how yesterday's card for One layer Wednesday came out. In the stamp set there are 4 bird images. I've decided to do a 4 card series, in this style, using each bird image. This is the second. Instead of pearls, this card has just a hint of glitter as its minimal embellishment.


Cardstock: PTI Rustic White

Stamps: Martha Stewart Clear Bird Stamps, PTI Everyday Button Bits

Ink: PTI Tea Dye Duo, Spring Rain, Color Box Dark Brown, Yellow Cadmium, Green, Memento Brown

Other: Fiber Scraps E-Z Walnut Ink, Prisma Glitter, Corner Rounder

OLW14: Square Outlines

Wednesday, July 28, 2010


One Layer Wednesday I applied the ink to the stamped image using q-tips. I used an old paint brush to flick the walnut ink onto my card. I wanted to try to create the look of those gritty square photographs that have been taken with an old camera.


The inside.


Cardstock: PTI Rustic White

Stamps: Martha Stewart Clear Bird Stamps, PTI Everyday Button Bits, Star Prints, In Bloom

Ink: PTI Tea Dye Duo, Spring Rain, Color Box Dark Brown and Yellow Cadmium, Memento Brown

Other: Fiber Scraps E-Z Walnut Ink, Queen&Co. Pearls, Corner Rounder

Reader's Gift Set

Monday, July 26, 2010


In my July order I finally ordered some Rustic Cream card stock and Prisma glitter. I love both products and this new stamp set, All Booked Up.


Hope today is the start of a great week for everyone!

Cardstock: PTI Rustic Cream, Lavender Moon
Stamps: PTI Butterfly Dreams, Take Note, All Booked Up
Ink: Memento Brown, Color Box Lavender
Other: Prisma Glitter, Binder Clip, Paper Clip, Circle Punch, Copic Marker RV32

July Blog Hop: Office Supplies

Sunday, July 25, 2010


This month's Papertrey Ink Blog Hop is all about office supplies. I decided to use paperclips to make bookmarks and create my own file folder tabs using a stamp from All Booked Up. I just received this set and couldn't wait to use it.

I used the mini rosette from my gift toppers to create the base for these cute bookmarks. Then I added this image from All Booked Up. I love this one, because I love to color with my copics. I added some glitter to the flowers.


I used the main image from All Booked Up to create my own tabs. I just stamped the image twice. Bottom end to bottom end and then score where the two bottoms meet to fold. Then I cut off the upper portion (where the circle is).

Cardstock: PTI Harvest Gold, Cream, Aqua Mist, lavender Moon, Enchanted Evening, Spring Rain, Hibiscus Burst

Stamps: All Booked Up

Ink: PTI Enchanted Evening, Berry Sorbet, Color Box Lavender, Memento Brown

Paper: PTI Bitty Box Basics, Bitty Dot Basics

Other: Fiskars Scallop Border Punch, Ribbon, Paperclips, Copics, Prisma Glitter, Hot Glue


It's A Hot One

Saturday, July 24, 2010

This is about the most she has done all day!
Notice she is right near the a/c vent.
She's no fool.

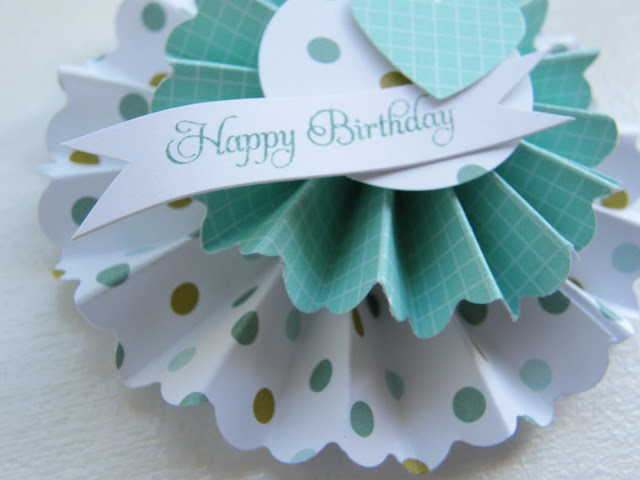
Gift Topper Tutorial

Thursday, July 22, 2010


You will need:
2 strips of the same paper measuring 8 x 2inches
2 strips of a coordinating paper measuring 8 x 1 and 1/2 inches
Any border punch
Hot glue gun
Double stick tape
Circle punch

Cut paper strips. Punch one side of each of the 4 strips with any of your favorite border punches. Score each piece at each inch. Turn strip over and score at each half inch. This will give you peaks and valleys which will make the accordion folding very easy.
 
Accordion fold each piece and attach the 2 like strips to each other at both ends using double stick tape or any glue that you prefer. Using double stick tape makes an instant bond and allows you to move on to the next step immediately.
 
Lay the paper ring on your work surface punched edge down. Push down on the center to create the rosette.
 
Add a bead of hot glue to both sides of the rosette.
 
Use a piece of silicone, if you have it, to flatten the bead of hot glue. This will make the second rosette lay flat on top of the larger one.
 

Attach the two circles together, attach a punched circle to cover up the hot glue and then embellish however you like.
 
I hope that helps. If you make some, let me know. I'd love to see them!


Products used or similar {affiliate links used}


One Layer Wednesday: Christmas In July

Thursday, July 22, 2010


I made this card for the new OLW challenge. I love these challenges because they force me to think outside of my normal process. I love how this card turned out and I probably wouldn't have made this without the challenge. Thanks Susan!

Play along, see what you come up with!

Cardstock: PTI Kraft

Stamps: PTI Peaceful Poinsettia, Take Note

Ink: Color Box Frost White, PTI Berry Sorbet

Copics: R08, R32, R35

Proudly designed by | mlekoshi playground |